If you are a fan of magic mushrooms, you might have wondered how to grow your own at home. One of the ways to do that is to make a spore print from a mushroom and use it to inoculate some substrate. A spore print is a collection of spores that fall from the gills or pores of a mushroom cap onto a surface. Spores are like seeds for mushrooms, and they contain the genetic material needed to produce new mushrooms.
Making a spore print from a mushroom is easy and fun. All you need are some fresh magic mushrooms, some foil or glass, and some patience. Here are the basic steps:
- Pick out a mature magic mushroom that has enough spores to print. A freshly picked mushroom is more likely to have live spores than a store-bought one. Avoid using mushrooms that are shriveled, bruised or appear old.
- Remove the stem so only the cap remains. If the cap is very large you can cut it and make a print of just a part of the mushroom.
- Place the cap on a piece of foil or glass, spore side down. Cover the mushroom with a glass or bowl to prevent air currents from carrying away your spores.
- Wait for 6-24 hours, depending on the species and the conditions. You can check the progress by lifting the glass and looking at the print.
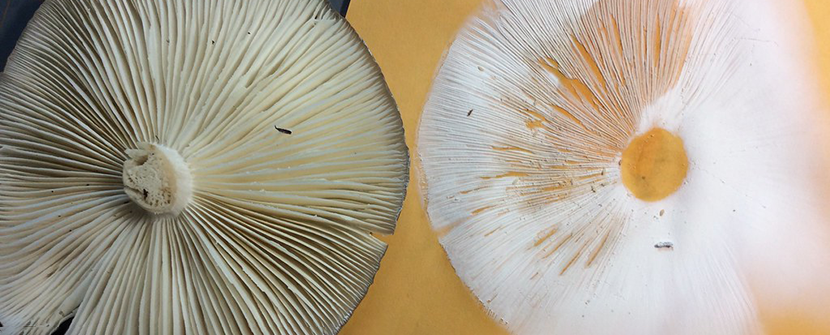
- Remove the cap and admire your spore print. You should see a pattern of spores that matches the shape of the gills or pores. The color of the spores can vary depending on the species, but most magic mushrooms have dark purple-brown spores.
You can make spore prints of different magic mushrooms and compare them. You can also experiment with different surfaces and colors to create interesting contrasts and effects.
To use your spore print for growing your own magic mushrooms, you need to make a spore syringe. A spore syringe is a syringe that contains mushroom spores suspended in sterile water. You can use it to inject spores into some substrate, such as grain or sawdust, and start the colonization process.
To make a spore syringe from your spore print, you need:
-
A sterile syringe with a needle
- A sterile jar with a lid that has a hole punched in it
- Some distilled water
- A pressure cooker or a pot of boiling water
- Some alcohol wipes
Here are the steps:
- Fill the jar with distilled water and screw on the lid. Sterilize the jar by placing it in a pressure cooker or a pot of boiling water for 15 minutes. Let it cool down completely before proceeding.
- Wipe the needle of the syringe with an alcohol wipe and insert it through the hole in the lid. Draw up some water from the jar into the syringe and squirt it back into the jar. Repeat this several times to mix up the water inside.
- Wipe the needle again with an alcohol wipe and scrape off some spores from your spore print into the needle. You don’t need too many, just enough to make the water slightly cloudy.
- Insert the needle back into the jar and squirt out the water with the spores into it. Shake the jar gently to distribute the spores evenly.
- Your spore syringe is ready! You can store it in a cool and dark place until you are ready to use it.
To use your spore syringe for growing your own magic mushrooms, you need to inoculate some substrate with it. There are many methods and materials for doing this, but one of the simplest ones is to use brown rice flour (BRF) cakes.
To make BRF cakes, you need:
- Some brown rice flour
- Some vermiculite
- Some water
- Some half-pint wide-mouth glass jars with lids that have four holes punched in them
- Some micropore tape
- A pressure cooker or a pot of boiling water
Here are the steps:
- Mix 2 parts vermiculite, 1 part brown rice flour, and 1 part water in a large bowl. The mixture should be moist but not soggy.
- Fill each jar with the mixture up to about half an inch from the top. Tap each jar lightly on a hard surface to settle the mixture and remove any air pockets.
- Wipe off any excess mixture from the rims of the jars and screw on the lids loosely. Cover each hole in each lid with micropore tape to allow gas exchange but prevent contamination.
- Sterilize the jars by placing them in a pressure cooker or a pot of boiling water for 90 minutes. Let them cool down completely before proceeding.
- Wipe the needle of your spore syringe with an alcohol wipe and inject about 1 ml of spore solution into each hole in each jar. Remove the needle and cover the hole with micropore tape again.
- Store the jars in a dark and warm place until they are fully colonized by white mycelium. This can take anywhere from a few days to a few weeks, depending on the strain and the conditions.
- Once the jars are fully colonized, you can birth them and place them in a fruiting chamber. A fruiting chamber is a container that provides high humidity and fresh air for the mushrooms to grow. There are many ways to make a fruiting chamber, but one of the simplest ones is to use a plastic bin with some perlite and a spray bottle.
To make a fruiting chamber, you need:
- A large plastic bin with a lid that has some holes drilled in it
- Some perlite
- Some water
- A spray bottle
Here are the steps:
- Fill the bottom of the bin with a few inches of perlite. Add enough water to make the perlite moist but not submerged.
- Remove the lids and the tape from the jars and gently slide out the BRF cakes onto a clean surface. Rinse off any loose vermiculite from the cakes and place them on top of the perlite in the bin. Space them evenly and leave some room between them.
- Spray the inside of the lid and the sides of the bin with water to create condensation. Place the lid on the bin and store it in a place that gets indirect natural light or artificial light for 12 hours a day.
- Fan and mist the bin at least twice a day to provide fresh air and humidity for the mushrooms. Be careful not to overwater or underwater the cakes, as this can affect their growth and health.
- After a few days or weeks, depending on the strain and the conditions, you should see small mushroom pins popping out of the cakes. These will grow into full-sized mushrooms within a week or two.
- Harvest your mushrooms when they are mature but before their veils break. To harvest, gently twist and pull them from the cakes without damaging them. Rinse off any dirt or debris and dry them with paper towels or a fan.
- You can eat your mushrooms fresh or dry them for longer storage. To dry them, place them on a baking sheet or dehydrator tray and expose them to low heat (below 150°F) for several hours until they are cracker-dry.
I hope this blog post inspires you to make your own spore prints from mushrooms and use them to grow your own magic mushrooms. Please note that this is not medical advice and I do not encourage or condone the use of any illegal substances. Please do your own research and be responsible and safe.